~If you would like to request a tutorial, email Collateral at collateraldamag3@gmail.com~

Share This!

Securis Tutorial

in
By Request -  A tutorial on using Securis 1.2.1


Main Screen

This is what you see as soon as you open the application. If it is your first time opening the application, an alert will pop up with an instructional blurb. After you close the alert, it will not show again.

There are two buttons on this screen (shown below):


Generate Passcodes: This button pulls up the Password Generator View. This view allows you to create complex passwords quickly and easily.

Stored Passcodes: This button pulls up the Stored Password View. This view allows you to view your saved passwords, as well as editing information such as the Source, Username, and/or the password itself.


Let's start with the Password Generator View. Tap the "locked" padlock button. You should now see a screen similar to the one pictured below.


Ok, this screen is easier than it looks. There are three main components to this screen: the slider, the 4 switches, and the "Generate" button.

Slider: The slider allows you to choose the length of your password. Sliding from left to right will increase the length of your password. The label to the right of the slider informs you of the current length you have chosen.

Switches: There are 4 switches. Toggling these switches allows you to change the properties of your password.  For Example: Toggling the switch labeled "Numbers" to "Off" will disable numbers from being used in your password.

"Generate" Button: This button generates your password. After generating your password you will see two new things on the screen; Your password and a little "i" (Information) button.  (pictured below)


Your Password: Once you have tapped the "Generate" Button, a password will appear above the button. You can press the button again to get a new password, as well as changing the slider and switch settings. 

Information Button: The little "i" is called an "Information Button". Pressing this button will bring up a screen similar to the one pictured below:


On this screen there are 5 buttons: Email, Copy, SMS, Save, Dismiss.

Email: This button emails the current password. This is useful for emailing to yourself, generating a password for a friend, or sending a password for a shared account to multiple people.

Copy: This button copies the current password to the clipboard. You can now paste the password into other applications such as Notes, Safari, or Messages.

SMS: This button only appears on SMS-Enabled Devices on iOS 4+. It allows you to text message the current password.

Save: This button only appears once you have created a master passcode (We will do that later), so don't freak out if you don't have it yet. This button allows you to save the password to your device in order to keep it safe and secure.

Dismiss: This button brings you back to the Password Generating View.


Tap Dismiss, and then "Done" in the top left corner. You should now be back at the main screen.

Now we will take a look at the Stored Passcode View. Press the "unlocked" padlock button. You should now see a screen similar to the picture below.


This screen allows you to set a "Master Passcode". This Passcode allows you to store passwords, usernames, etc. on your device without being easily seen by others.

At this screen, make a 4 digit password. It will ask you to confirm the password. Remember this password.


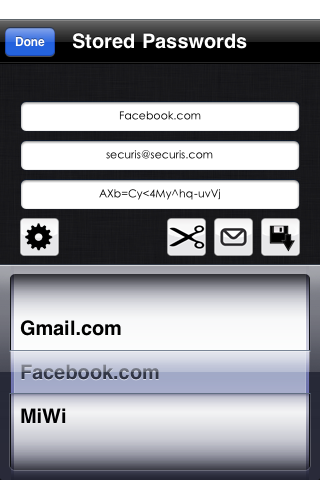
This screen has 3 main components: The text boxes, the buttons, and the picker wheel. We will go through all of these.

Text Boxes: There are three text boxes at the top. The top is the "Slot" or "Source", the middle is the "Username", and the bottom is the "Password". All three text boxes can be edited by tapping on them. When you do so, the keyboard will appear and you can enter information. Pressing "Done" on the keyboard will save your changes.
  • Slot/Source: This box is where you enter what the password is for. Example: Facebook.com, Gmail.com, etc. 
  • UserName: This is where you enter the username that goes with the password. 
  • Password: This is where you can enter the password for the account. When you save a password from the generate view, this is where it ends up. You can also enter your own password if you do not wish to generate a new one.

Now we will go through the buttons, from left to right. 

Options Button: This button looks like a cog. When you tap this button, you are presented with two options similar to the picture below. 


  • Reset Master Code: This option allows you to set a new master code. 
  • Dismiss: This brings you back to the Stored Passcode screen.


Press Dismiss.

The next button is SMS,

SMS: This button only shows up on SMS-enabled devices with iOS 4+. The button looks like a little message bubble. This button will text message the current source, username, and password.

The next button is Copy.

Copy: This button looks like two papers, similar to the copy button on a computer. It copies the current password to the clipboard. You can now paste the password into other applications such as Notes, Safari, or Messages.

The final button is email.

Email: The button on the far right is email, and looks like an envelope. The button emails the current source, username, and password. This is useful for emailing to yourself, generating a password for a friend, or sending a password for a shared account to multiple people.


Okay now we can move on to the bottom-most component, the picker wheel.

Picker Wheel: You can scroll this wheel up and down, revealing 15 save slots. The blue-tinted bar across the middle tells you which slot you are currently editing/viewing. This allows you to easily view passwords you have saved on your device.

Press "Done" in the top left corner. You should now be back at the main screen.


That's it guys.

Version 2.0.0 is on its way with a TON of new features. This tutorial will be updated upon release. If you have any questions/comments/suggestions/complaints/compliments, drop me an email at collateraldamag3@gmail.com.

Read More...

App Release: Securis

in


Have you ever forgotten a password? Used a password that was too easy to guess? Use the same password for everything?

These mistakes can lead to the loss of private information and possibly financial insecurity. Don't let that happen to you.

Securis is a Password Generator and Manager that can create and store passwords, keeping your accounts and personal information safe and sound.

It not only generates and stores passwords but also:
- Has a master passcode so that others cannot access stored passwords
- Can copy passcodes to be used in other apps (ex. Safari)
- Can email codes to yourself or others
- Saves not only the password, but can also save username and source information
- Passcodes can be from 6 - 26 characters, using letters. numbers, and symbols.
- Beatutiful seamless interface which makes working with securis easy and fun.

**COMING SOON**
-*Saved Password Revamp*
-Small Graphical and UI Changes
-Performance Enhancements


http://itunes.apple.com/us/app/securis/id392732678?mt=8#

Read More...

iPhone Tutorial ~ UIButtons and Animation

in


So you want to animate your UIButtons but don't know where to start? Well here is a guide that will have your UIButtons jumping around in no time. For this tutorial we will be using the "UIViewAnimationTransitionFlip" Animation. Basically, it flips stuff. 
If you look up most other tutorials on the web, they will say that in order to flip a button, you need 3 things: 2 buttons and a containing view. This is NOT TRUE. I will show you how to flip a single button. 
First, create your button, either in the Interface Builder or programmatically. If you don't know how to do that, go learn and come back. 
So, once you have your button (mine is named "btnMyButton") , make a method that gets called on UIControlEventTouchUpInside. 


- (IBAction) btn1_click
{

[UIView beginAnimations:nil context:nil];
[UIView setAnimationDuration:0.5]; //Sets the Animation time to .5 Seconds

/*The Below Sets the transition to flip the button from the right. */
[UIView setAnimationTransition:UIViewAnimationTransitionFlipFromRight forView:btnMyButton cache:YES];

[UIView commitAnimations];//Starts the Animation

}
That's it. Thats all you need to do to animate a button. Quite simple, really. The key that most people miss is that you can use a UIButton for the "forView:" key. Instead of assigning a UIView to this and flipping a button that is on top of the view, we are simply using the UIButton in the "forView:" key and flipping the button itself. 


~Collateral

Read More...

iPhone Tutorial ~ NSZombieEnabled and EXC_BAD_ACCESS

in


 EXC_BAD_ACCESS is an error received when a command is given to an deallocated target. Basically, you've released the object that your trying to send commands.  The only problem is, the error isn't very descriptive in telling you which object gave you that error, making it tricky to fix. 


Well there is a feature that a lot of people don't know about called "NSZombieEnabled". This makes it A LOT easier to find and debug Bad-Access errors. How it works is by leaving a dummy or "zombie" of every object you release in memory and then alerts you when you have sent a command to one of the dummies. Here is a picture of "NSZombieEnabled" in action:


It shows the exact same scenario as the top picture, except with "NSZombieEnabled" enabled. 
So how do we set this up? Its actually VERY simple. First right-click on your executable, and click "Get Info"


Then go to the "Arguments" tab and click on the bottommost plus sign (environmental variables). Then fill in the information as follows (REMEMBER TO CLICK THE CHECKBOX):


Then build and debug your program. It should now tell you the deallocated object that you sent a command to.
Just remember to uncheck the box when your ready to release. 
~Collateral

Read More...

iPhone Tutorial ~ Reachability and Checking Network Status

in


This is a tutorial on the Reachability class and checking your network status. Apple's Human Interface Guidelines for the App Store require any application that uses a network connection to check to see if that connection is active and if not, display an alert telling the user. Well, i spent a good 2 days trying to figure this one out, and hopefully with this tutorial, you'll be able to do it in 10 minutes. 
The first thing that is tricky about this is that the Reachability class that is used for this ISN'T EVEN INCLUDED IN THE SDK! WTF APPLE?!? The Class is actually found in one of Apple's sample code applications with the same name. I have downloaded that sample and extracted the Reachability class from it for you to download, here:
DOWNLOAD - REACHABILITY CLASS
You can download Apple's original sample code application in its entirety from HERE.


Unzip the Reachability class and add the Reachability.h/m to your Xcode project. This class also requires use of the SystemConfiguration Framework. So right-click on the "Frameworks" folder, go to "Add" and then "Existing Frameworks". 


Then click on "SystemConfiguration.framework". 


Alright, You have now successfully added the Reachability class to your project. Now how do we utilize it?
Well what we are going to do is check for network connectivity, and if there is none, alert the user. If there is, we will use NSLog to log in the console how the user is connected. 
First, declare a method: - (void)networkCheck; in your .h file.
Then, move to your .m file and fill in the method:


-(void)networkCheck{
Reachability *curReach = [[Reachability reachabilityForInternetConnection] retain];
NetworkStatus netStatus = [curReach currentReachabilityStatus];
switch (netStatus)
{
case NotReachable:
{
UIAlertView *connectionAlert = [[UIAlertView alloc] init];
[connectionAlert setTitle:@"Error"];
[connectionAlert setMessage:@"myApp was not able to reach the host. Please check your network conenction."];    
[connectionAlert setDelegate:self];
[connectionAlert setTag:1];
[connectionAlert addButtonWithTitle:@"Back"];
[connectionAlert show];
[connectionAlert release];
NSLog(@"NETWORKCHECK: Not Connected");
break;
}
case ReachableViaWWAN:
{
NSLog(@"NETWORKCHECK: Connected Via WWAN");
break;
}
case ReachableViaWiFi:
{
NSLog(@"NETWORKCHECK: Connected Via WiFi");
break;
}
}
}


First  we are declaring *curReach as our current network connectivity. We are then assigning that to a NetworkStatus object (Thanks to your Reachability Class) and preforming a switch-case on it. If it is "Not Reachable", we alert the user. If it connects, we log to the console by which method the connection is being preformed. 


Thats it :) That should get you set for compliance with Apple's HIG's. See ya next time.
~Collateral

Read More...

iPhone Tutorial ~ UISwitch Colors

in


Alternate UISwitch Color. If you've ever used an iPhone, you've definitely seen the orange "AirPlane Mode" switch, designed to say "Hey, I'm here, switch me!". Well here's a tutorial about how to do it yourself. But be careful, this uses undocumented API's and Apple can/will reject your app for doing this. 


But as for it being so naughty and getting your app rejected, its actually VERY simple and requires only one line of code:


UISwitch *mySwitch = [[UISwitch alloc] initWithFrame:CGRectMake(50, 100, 0, 0)];
[mySwitch setAlternateColors:YES]; // OrangeColor
/* Do Stuff Here. */
[self.view addSubview:mySwitch];
[mySwitch release];

Thats it. It's THAT simple. Thanks again to Skylar for showing me this tip.


~Collateral

Read More...

Android Tutorial ~ Installing the Android SDK

in


With the release of Verizon & Motorola's "Droid" phone series, I decided to get ready to start developing on the Android SDK. So here is a tutorial to get you started on installing Eclipse (JAVA IDE) and the Android SDK on your Windows, Linux or Mac system. 


First, what is Android? Android is Google's Open-Source mobile phone operating system. Android is based off of the linux kernel and is made to be an alternative to the iPhone OS or Windows Mobile. Android applications are developed in the JAVA programming language, allowing programs to be used on multiple different hardware configurations. This was a smart move on Google's part as JAVA is the #1 most used programming language according to developer.com. Objective-C (used for iPhone development) is not even on the list. 


To install the Android SDK, you are first going to need Eclipse. Eclipse is a free and open-source IDE used for development in JAVA, C, C++, PHP, and other languages. You can install Eclipse from their website, http://www.eclipse.org/. Make sure to install the "Classic" version, which is at the bottom of their "Downloads" page. 


Next you need to download the Android SDK from here : http://developer.android.com/sdk/index.html. Unzip it and put it somewhere you will remember it. I unzipped it to /Users/Collateral/Android SDK/. 


Now Open Eclipse and go to "Help" and then "Install new Software".


You will see a button titled "Add", click that. Under "Name", name it whatever you want, under "Location" add: " https://dl-ssl.google.com/android/eclipse/  ". It will download some stuff. Once you are back on the "Install New Software" menu, click on the "Work With:" drop down and click on the location you just added. 


Check "Developer Tools" and Install them. Restart Eclipse. Go to "Preferences" and click "Android" on the right hand side. Where it says "SDK Location" browse to the location where you unzipped the SDK that we downloaded.
Once you have done that, click "Finish" and then click the button. 


Click "Available Packages" and then check the android one. Click "Install Selected". Agree to All and wait for all of it to download and install. Restart Eclipse.


Congratulations, you now have the Android SDK installed! But we still need to set up an emulation product.


So press the  button again, and then click on "Virtual Devices". Click "New" and add a new device with these settings :


Click "Create AVD". Then Select your new device and click "Start". You should see this:


Congrats! You now have the Android SDK and a working Android Emulator!
Go ahead and start developing! :)


~Collateral

Read More...

iPhone Tutorial ~ NSUserDefaults and Settings.bundle - Part II

in


Ok, now that we have learned the basics of NSUserDefaults, we can now start to make a Settings Bundle. What is a Settings Bundle you may ask? A settings bundle is the application preferences that you see in the Settings.app. These are loaded automatically when you enter Settings.app and allow you to change the NSUserDefaults from outside the application itself; a very helpful feature.


To make a Settings Bundle we have to start off by making a folder named "Settings". Inside of that, make a new file in TextEdit and make it plain text. 


Then fill your plain-text document like this:


<?xml version="1.0" encoding="UTF-8"?>
<!DOCTYPE plist PUBLIC "-//Apple Computer//DTD PLIST 1.0//EN" "http://www.apple.com/DTDs/PropertyList-1.0.dtd">
<!--
   Root.plist
   Preference settings for MyApp
-->
<plist version="1.0">
    <dict>
    </dict>
</plist>
Once you are done, save it as "Root.plist". Now rename your "Settings" folder to "Settings.bundle". The settings folder should become a lego-block-like icon and the Root.plist should not be visible. Now, Open Xcode and open your project. Click "Project" and then "Add to Project".


Then choose your Settings.bundle. Click the arrow next to it in Xcode and you should see your Root.plist again. If you can, good, move on. If not, check to make sure everything is spelled correctly. "Settings.bundle" and "Root.plist" are CASE SENSITIVE.

Now as an example, we will add a username to the preferences. So open up Root.plist in the Property List Editor (Right Click and Select "Open with Finder"). You should see a key labeled "Root", click on it and then click "Add Child." Make the new child's key "Title", make its type "String", and make its value the name of your application. Now click on Root again. Make another child, this time with a key named "PreferenceSpecifiers". Make its type "Array".

Now click on "PreferenceSpecifiers" and then on "Add Child" (You should now be adding a child to PreferenceSpecifiers, not to Root). This items key, by default, should be "Item 0". Make its type "Dictionary".

Almost done. Now add 4 children to "Item 0" and make them match what I have below:


The "Title" key for Item 0 is the title that the user will see when he/she edits this in Settings.app. The "Type" key tells Settings.app that it is a PSTextFieldSpecifier, which is basically a UITextField. The "Key" key tells the program which key we are loading from in our code. NOTE: THIS IS OUR VARIABLE NAME FOR INSIDE THE CODE. See Here. And the default value is pretty self-explainatory. It is the value that is loaded if none is entered.

Now save Root.plist. Compile and run your app in the simulator. Exit the app and enter Settings.app. Check to see if there is an entry for your app at the bottom. If there is, then you have done it correctly.

For this example, the code to load the username we stored into a NSString would be:


NSUserDefaults *prefs = [NSUserDefaults standardUserDefaults];
NSString *strUserName = [prefs stringForKey:@"userName"];
Here are the other types for storing NSUserDefaults into your Settings.bundle:


  1. PSTextFieldSpecifier
  2. PSTitleValueSpecifier
  3. PSToggleSwitchSpecifier
  4. PSSliderSpecifier
  5. PSMultiValueSpecifier
  6. PSGroupSpecifier
  7. PSChildPaneSpecifier
Congratulations! You now have a working Settings Bundle and you can store and load information from NSUserDefaults!

Go Back to Part I

~Collateral

Read More...

iPhone Tutorial ~ NSUserDefaults and Settings.bundle - Part I

in


Alright, This is a tutorial on the NSUserDefaults feature and how to use them in conjunction with Settings.bundle.


First off, What is NSUserDefaults? If you want the "Apple Definition" you can find it HERE. But basically, NSUserDefaults is a way to store data for a another point in time. You can use NSUserDefaults to save a character's level, or what items he/she's carrying. Or You can use it to remember a username and password or whether the user prefers a light or dark GUI. Basically, it saves stuff. 
So how do I use NSUserDefaults? Well, Apple has made it VERY easy actually. There are two ways to access data in NSUserDefaults, saving data and loading data. We'll start with saving.


NSUserDefaults *prefs = [NSUserDefaults standardUserDefaults];
[prefs setInteger: 0 forKey: @"whatever"];//Save
[prefs synchronize];


 That ^^ is a very simple example of saving data to NSUserDefaults. I'm starting off by labeling [NSUserDefaults standardUserDefaults] as just simply "prefs", mostly because prefs is about 20x easier to write.  I am then saving "0" as an integer to the key "whatever". Now, you may be asking, what is a key? A key is basically a save slot. whenever you have an option you have a slot. For example, if you have a game where you have to save the character's inventory, you will probably store an array of the character's objects into a key named "inventory". Basically a key is a spot in the NSUserDefaults where certain info is stored.  And [prefs synchronize] just writes it to the disk.


Here are the different syntaxes you can use when saving to NSUserDefaults (of course all linked to their reference :p):


NSUserDefaults *prefs = [NSUserDefaults standardUserDefaults];
NSString *strUserName = [prefs stringForKey:@"userName"];


Here I am loading a String from the key "userName" and storing it into a NSString titled "strUserName". Easy Peasy. Here are the syntax's and references for what you can use while loading data. Be careful it IS different from the first list.


Read More...